PIONEER XDJ-XZ
 for VirtualDJ 2020+ Last Update : July 2021
SETUP
Drivers
Drivers (for both Windows and Mac OSX): Install the latest drivers from
https://www.pioneerdj.com/en/support/software/all-in-one-system/xdj-xz/#driversVirtualDJ Setup
Download and install VirtualDJ from https://www.virtualdj.com/download/index.html (in case you have not done already)
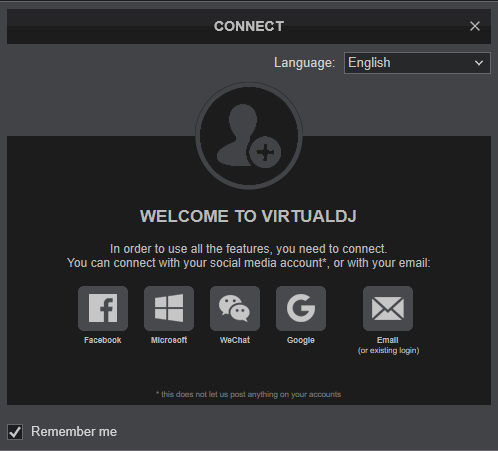
Once VirtualDJ is launched, a Connect Window will appear to login with your virtualdj.com account credentials.
A Pro Infinity or a Pro Subscription License is required to fully use the Pioneer XDJ-XZ Without any of the above Licenses, the controller will operate for 10 minutes each time you restart VirtualDJ.
http://www.virtualdj.com/buy/index.html
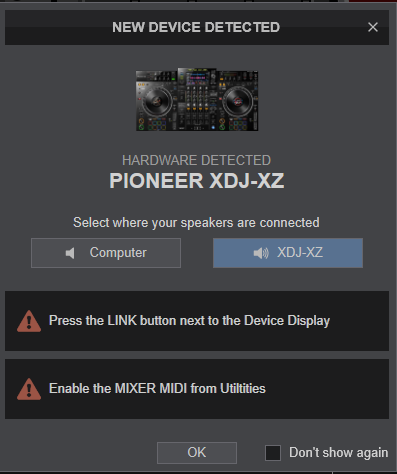
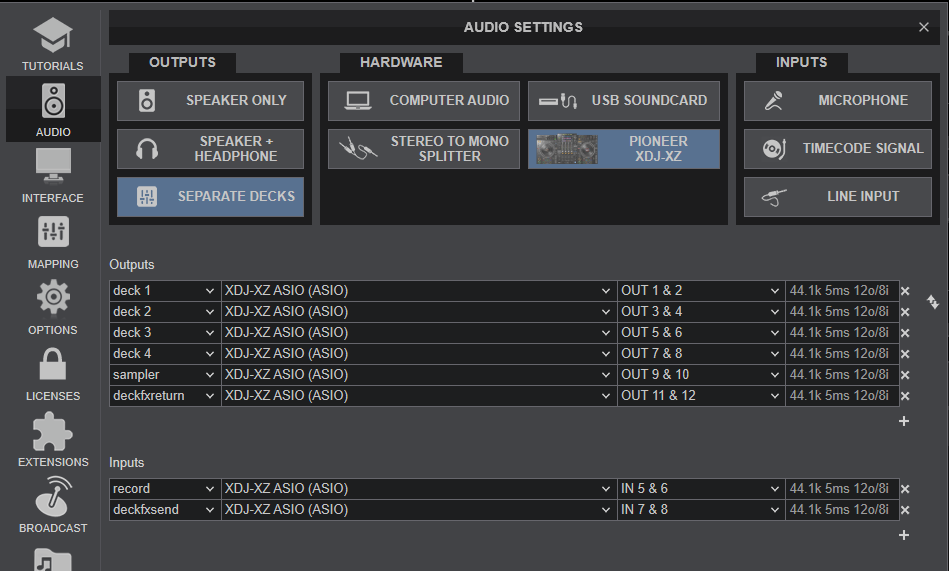
 A detection windows will appear right after, verifying proper connection. Have your speakers connected to the rear-panel of the XDJ-XZ and click on the XDJ-XZ button for VirtualDJ to apply the pre-defined audio setup with the built-in sound card of the XDJ-XZ You can still change that from Settings->AUDIO tab.
Click to OK
PC MODE
To control VirtualDJ Decks with the XDJ-XZ :
- Press the LINK button at the left side of the XDJ-XZ Display
- Press the LOAD 1 button at the right side of the XDJ-XZ Display
- Press the LOAD 2 button at the right side of the XDJ-XZ Display
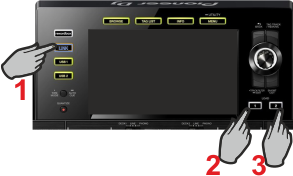 The unit is now ready to operate. with VirtualDJ
MIDI Operation
The unit should be visible in the MAPPING tab of Config as 3 separate units (the main unit , the mixer and an additional one for the Display) and the “factory default” available/selected from the Mappings drop-down list for all units. The factory default Mapping offers the functions described in this Manual, however those can be adjusted to your needs via VDJ Script actions.
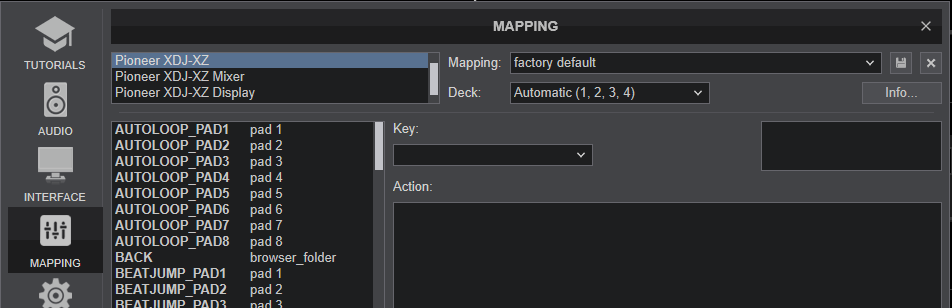
Find more details at
https://www.virtualdj.com/wiki/VDJ8script.htmlAUDIO Setup
The unit has a pre-defined Audio setup and a special button in the AUDIO tab of Config to provide that.
Alternative audio configurations can be applied See
Advanced SetupFor further software settings please refer to the User Guides of VirtualDJ.
https://www.virtualdj.com/manuals/virtualdj8/index.htmlRefer to the manual of the unit for further features-settings. at...
https://www.pioneerdj.com/en/support/documents/xdj-xz/
LAYOUT
 S SHIFT
. Hold this button down to access secondary functions of the Pioneer XDJ-XZ. Note that the SHIFT button is not a MIDI button and the SHIFT functions on the unit are limited to the ones available from the unit's firmware.
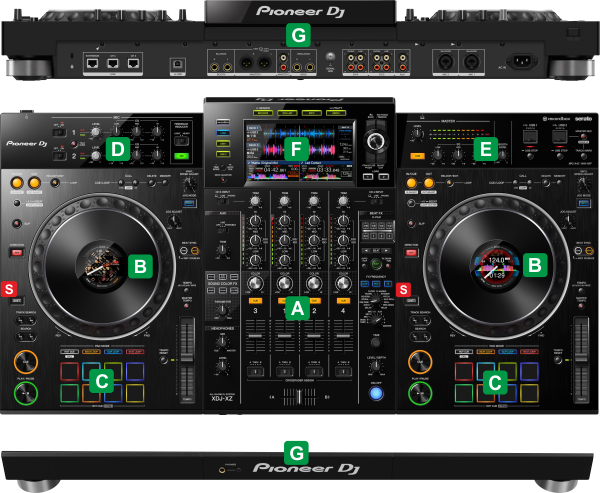
The functionality of each button, knob and slider per section (as shown in the image above) will be explained in detail in the following chapters
A Mixer & EffectsB Deck ControlsC Performance PadsD MicrophonesE Master & USB SourcesF Browser & DisplayG Front & Rear panels
MIXER & EFFECT CONTROLS

MIXER CONTROLS
KEY
ACTION
1 CROSSFADERBlends audio between the left and right assigned mixer channels2 CF ASSIGNAssign Mixer Channel to A (Left) or B (Right) side of the Crosssfader or set to THRU for Crossfader not to affect its output3 VOLUMEAlter the output Volume of each Mixer Channel4 CUE/PFLPress these buttons to send channel's pre-fader signal to the Headphones Channel for monitoring. When engaged, the button will be lit5 COLORUse this knob to apply the selected Color FX on each Mixer Channel. When in middle position, the selected Color FX is not applied, even if it is enabled from the selection buttons6 COLOR FX SELECTUse these buttons to select one of the 6 available Color FX (Space, Dub Echo, Sweep, Noise, Crush and Filter). 7 COLOR PARAMETERUse this knob to adjust the Parameter of the selected Color FX. 8 3-BAND EQUse these 3 knobs to adjust the 3 Bands(Low, Mid, High) of the Equalizer for each Mixer Channel. 9 TRIMAdjusts the pre-fader output level (gain) of each mixer channel. 10 CH3/CH4 INPUTSet CH3/CH4 to PC position for audio signal from VirtualDJ Decks 3/4 to be routed to Mixer Channels 3/4. Use this position for Timecode/DVS Control (See Advanced Setup).
Set CH3/CH4 to LINE position for audio signal from LINE Inputs CH3/CH4 be routed to Mixer Channels 3/4.
Set CH3/CH4 to PHONO position for audio signal from PHONO Inputs CH3/CH4 be routed to Mixer Channels 3/411 AUX SOURCE INPUTSet to PC position for VirtualDJ to send audio from the set output to the Master Output of XDJ-XZ. By default the USB AUX Output channels are set to output the VDJ Sampler.
Set to LINE/PORTABLE position for the audio signal from AUX Input (rear connection) to be routed to the Master Output.12 AUX VOLUMEAdjust the output Volume of the AUX input. By default this knob is assigned to adjust the Master Volume of VirtualDJ Sampler.13 HEADPHONES MIXTurn to mix between Cue and Program in the Headphone channel. When all the way to the left, only channels routed to the Headphones channel (via the CUE buttons) will be heard. When all the way to the right, only the Program mix will be heard.14 HEADPHONES LEVELAdjusts the level of the Headphones Output (Connection at the front panel)EFFECT CONTROLS
The BEAT FX section is used to apply Hardware Effects to Decks/Master/Mic/AUX-Sampler,
15 X-PADUse this X-PAD touch-strip slider or the touch-pads to temporary trigger the selected Beat-FX and adjust it's beats at the same time.16 BEATSUse these buttons to half/double the beats for the selected Beat-FX17 FX-QUANTIZEWhen enabled, Beat-FXs will be quantized/snap to nearest beat18 FX-TAPTap this button on Tempo for a different BPM/Beatgrid to be used from the FX-Beat, than the one VirtualDJ sends from its Decks19 FX-AUTOUse this button to get BPM/Beatgrid from VirtualDJ again (if manually set differently)20 FX-FREQUENCYUse these buttons to allow to the triggered Beat FX to apply to Low, Mid, High frequencies of the audio signal. 21 FX-SELECTUse this selector knob to select one of the available Beat FX. The name of the selected Effect is displayed on the main LCD. 22 FX-ASSIGNUse this selector knob to select to which source the effect will apply to. (Decks, Master, Mic, Sampler/AUX). The selected source will be displayed on the main LCD. 23 FX-TIMEUse this dial to fine adjust the time interval between 2 beats for the selected Hardware effect. 24 FX-LEVELUse this knob to adjust the Level/Depth of the selected Beat FX.25 FX-ONUse button to enable/disable the selected Beat FX. Its led will flash when enabledNotes - The Mixer section of Pioneer XDJ-XZ is operating in hardware mode, meaning that audio is mixed from the actual device and not the VirtualDJ mixer. However, all mixer elements are capable of sending MIDI messages and let VirtualDJ know of their positions and see those on the VirtualDJ skin (useful mostly for Video mixing, auto MASTER deck selection etc). For this feature, MIXER MIDI MESSAGES needs to be enabled from XDJ-XZ Utilities (see Advanced Setup)
- STEMS EQ: When MIXER MIDI MESSAGES are enabled from device's Utilities, Stems EQ of VirtualDJ can be applied to middle mixer channels (Decks 1 and 2) by using the outer channels EQ knobs. See https://virtualdj.com/manuals/virtualdj/interface/mixer/audio/index.html#hardwareadvancedeq Case D.
- The type/curve of Equalizer can be changed from XDJ-XZ Utilities (see Advanced Setup)
- The Beat Effects triggered from the XDJ-XZ are hardware. VirtualDJ (software) Effects can still be applied from the GUI or different MIDI device. Both Hardware and Software Effects are post-fader
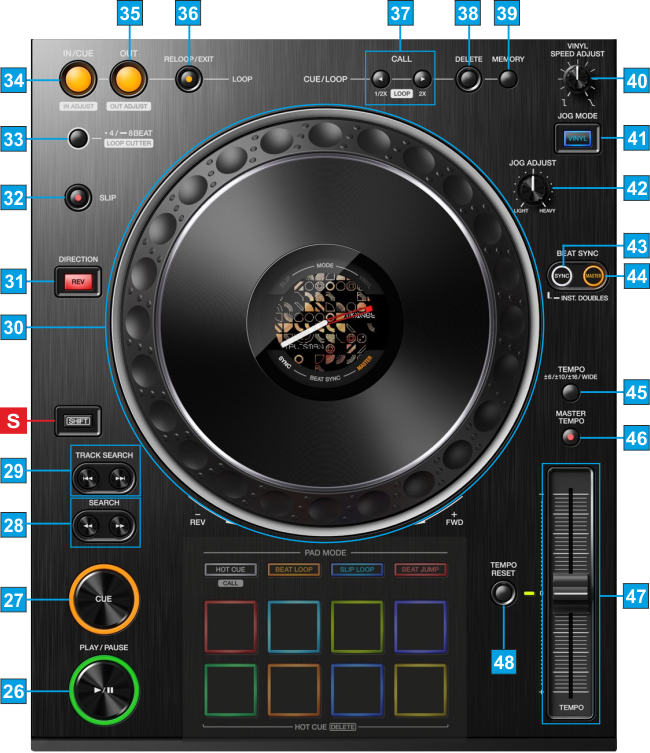
DECK CONTROLS
KEY
ACTION
S SHIFTHold this button down to access secondary functions of Pioneer XDJ-XZ (mostly for Jog Seek and Pads.
Note : The SHIFT button is not sending MIDI, and cannot be used as a key modifier26 PLAY/PAUSEPlay/Pauses the track27 CUEWhen the Deck is paused, you can set a temporary Cue Point by moving the Platter to place the Audio Pointer at the desired location and then pressing the Cue Button. During playback, you can press the Cue Button to return the track to this Cue Point. (If you did not set a Cue Point, then it will return to the beginning of the track.). If the Deck is paused, you can press and hold the Cue Button to play the track from the Temporary Cue Point. Releasing the Cue Button will return the track to the temporary Cue Point and pause it. To continue playback without returning to the Temporary Cue Point, press and hold the Cue Button, then press and hold the Play Button, and then release both buttons.28 SEARCHUse these buttons to move track backwards/forward by 4 beats. Keep the buttons pushed for continuous seeking29 TRACK SEARCHUse the >> button to load next track from the focused Browser list.
Use the << button to move loaded track to its beginning.
Double press the << button to load the previous track30 JOGPressure sensitive platter for scratching or bending. When in Vinyl mode, use the upper part of the wheel to scratch and the outer part to bend. When in Bend mode (Vinyl mode is disabled), use any part of the wheel to bend.
Hold SHIFT down and then use any part of the jogwheel to seek (Search) track forward/backwards.
The small Display will offer useful track's information, such as BPM, Time, Pitch, Pitch range, Album Art, song-progress wave and position, Deck number etc. The Display offers 3 different views and can be selected from the device UTILITIES 31 REVUse this button to play the track in reverse. Track will resume forward playback when disabled.
If Slip mode is enabled, press and hold this button to play track in reverse. When released, track will resume forward playback from the position it would have been if the Reverse button was never pressed.32 SLIPUse this button to enable/disable Slip mode. When Slip mode is enabled, several functions such as Hotcues, Loops, Scratching etc, will act temporary (track will resume playback from the position it would have been if this function was never executed)33 LOOP 4 BEATUse this button to set a 4 Beats Loop. Hold down for more than 2 seconds to set a 8 Beats Loop34 LOOP INUse this button to set current track's position as the beginning of a manual loop. When in Loop, use this button to set jogwheel to Loop-In Adjust mode and then use the jogwheel to fine-adjust the start point of the loop. (led will blink fast) 35 LOOP OUTUse this button to set current track's position as the end point of a manual loop. When in Loop, use this button to set jogwheel to Loop-Out Adjust mode and then use the jogwheel to fine-adjust the end point of the loop.(led will blink fast)36 RELOOP EXITUse this button to exit the Loop. If a loop was enabled before on this track, use this button to enable the last triggered Loop37 CALLUse the < (1/2X) button to half the size in beats of the Loop.
Use the > (2X) button to double the size in beats of the Loop.38 DELETEUse this button to delete the Saved Loop of the track (1st-default slot)39 MEMORYUse this button to save (and enable) a Loop at the current position to the 1st (default) Saved Loop slot. When a track has a Saved Loop at the default slot, use this button to enable the Loop at its saved position. Track will jump to this position if current position is later to the Saved Loop, and will not jump if earlier.40 VINYL SPEED ADJUSTUse this knob to adjust the time that the track will need to completely stop, when track is paused. For instant stop, set the knob to its minimum position (left)41 VINYLUse this button to toggle between the CD (Bend) and Vinyl (Scratch) modes for the Jogwheel42 JOG ADJUSTUse this button to adjust the tension of the jogwheel 43 SYNCUse this button to match Tempo and Beat-Phase of the deck with the values of the Master Deck. The Master Deck selection is made automatically by VirtualDJ, mostly depending on the Deck that is playing out in Master, but can be set manually as well.44 MASTERUse this button to manually set a deck as Master Deck and force all other decks to sync to the Master Deck when SYNC is used. The Master Deck selection is made automatically by VirtualDJ, mostly depending on the Deck that is playing out in Master. To return to the automatic selection, press again the button on the deck that is currently lit.45 TEMPO RANGEUse this button to select the next % range for the Pitch fader. In order the ranges to match with ones available on the Display, the pitch ranges cycle though the values 6%, 10%, 16% and 100% (WIDE) . Other values can be selected from the GUI of VirtualDJ.46 MASTER TEMPOUse this button to enable/disable Key-Lock (Master Tempo). When enabled, the Key of the track will retain its value when the Tempo of the track is changed.47 PITCH/TEMPOPitch fader to adjust the Tempo of the track. 48 TEMPO RESETUse this button to gradually reset the Tempo of the track to its original BPM value. The LED next to this button will be lit when the Tempo is at the middle position (Track's original BPM) and will blink while Pitch is resetting
PERFORMANCE PADS
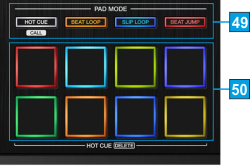
The 8 RGB Pads of the XDJ-XZ offer various functions, depending on the selected Pad mode. Each of the 4 Pad mode buttons offers 2 individual modes. One with the press of the mode button, and an additional mode with press of the mode button while SHIFT is held down. The 8 modes represent a page of the PADS section on the default VirtualDJ GUI.
Note Due to firmware limitation, Split Pages are not offered from the device's Pad mode buttons.
KEY
ACTION
SHIFT ACTION
49 PAD MODE Press any of the 4 available Pad mode buttons to set the Pads to Hotcues, Loop, Loop Roll and Beatjump mode.Press any of the 4 available Pad mode buttons to set the Pads to Saved Loops, Sampler, Slicer and Keycue mode. 50 PADS The 8 Pads offer different functionality depending on the selected modeThe 8 Pads offer different functionality depending on the selected mode The Parameters of each mode can be adjusted from the VirtualDJ GUI (Pads section)
Read further details about Pads in the
VirtualDJ 8 manualHOTCUES
Press the HOT CUE mode button to set the PADs to Hot Cue mode (button will be lit red) and automatically load the Hotcues Pads page in VirtualDJ GUI
Each one of the 8 pad assigns a Hot Cue Point (1 to 8) or jumps the track to that Hot Cue Point (if assigned).
When a Hot Cue Button is unlit, you can assign a Hot Cue Point by pressing it at the desired point in your track. Once it is assigned, the Hot Cue Button will light on.
Hold SHIFT and then press a pad to delete its assigned Hot Cue Point.
.
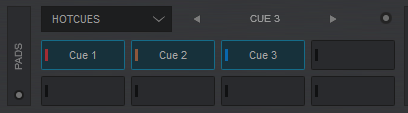
Hotcues Pads Page – VirtualDJ GUI
LOOP
Press the BEAT LOOP mode button to set the PADs to Loop mode (button will be lit green) and automatically load the Loop Pads page in VirtualDJ GUI
Press one of the pads to trigger an Auto Loop of a different size in beats, depending on the selected page. There are 6 different pages available with sizes starting from 1/32 up to 128 beats.
Use the Parameter arrow buttons from the VirtualDJ GUI (Pads section) to select the previous/next page with the desired Loop sizes
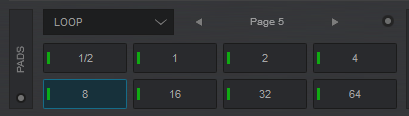
Loop Pads Page – VirtualDJ GUI
LOOP ROLL
Press the SLIP LOOP mode button to set the PADs to Loop Roll mode (button will be lit cyan) and automatically load the Loop Roll Pads page in VirtualDJ GUI
Press one of the 8 pads to trigger a momentary Loop Roll. Once the Pad is released, the track will resume playing from the position it would have been if the Loop Roll was never triggered. The exit point will be visible on the waveform of the VirtualDJ GUI with an additional “running” play marker.
Hold SHIFT to get a ½, ¾, 1 and 2 beats Loop Roll sizes for the 4 low pads.
Use the Page menu to apply the Loop Rolls to Video.
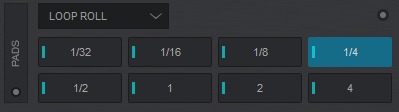
Loop Roll Pads Page – VirtualDJ GUI
Beatjump mode
Press the BEAT JUMP mode button to set the PADs to Beat Jump mode (button will be lit orange) and automatically load the BeatJump Pads page in VirtualDJ GUI
In this mode, each one of the Pads will jump the track backwards/forward by the amount of beats depending on the selected page/bank (from 1/8 beats to 32 bars)
Use the Parameter arrow buttons from the VirtualDJ GUI (Pads section) to select the previous/next page with the desired Beats sizes
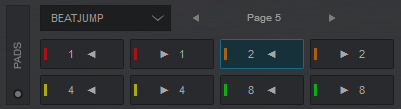
Beatjump Page page
Saved Loop mode
Hold SHIFT down and then press the HOT CUE mode button to set the PADs to Saved Loop mode (button will be lit white) and automatically load the Saved Loop Pads page in VirtualDJ GUI
In this mode, the 8 Pads represent a slot where a Loop can be saved. When a slot is empty (Pad is unlit), press a Pad to save and trigger a Loop at the current position. Press the same Pad to exit the loop. When a loop is saved, press the Pad to enable the saved loop and jump to its position if before current track's position.
Hold the same Pad for more than 1 second to delete the Saved Loop.
Hold SHIFT and then press a Pad to load a Saved Loop and jump to its position regardless the current track's position.
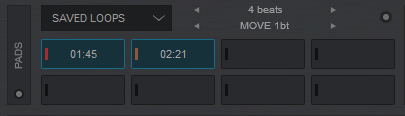
Saved Loop Page page
SAMPLER
Hold SHIFT down and then press the BEAT LOOP mode button to set the PADs to Sampler mode (button will be lit magenta) and automatically load the Sampler Pads page in VirtualDJ GUI
Each one of the 8 pads triggers a sample from the selected Sampler Bank of VirtualDJ. If a bank has less than 9 samples, both sides of the XDJ-RX2 will control the same samples. If a bank has more than 8 samples, the left side of the XDJ-RX2 will control samples 1 to 8 and the right side samples 9 to 16.
Press the pads to trigger a sample. Depending on the selected trigger Pad mode, use SHIFT and the same pads to stop the sample.
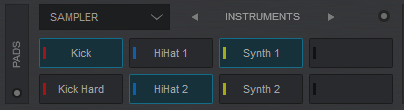
Sampler Pads Page – VirtualDJ GUI
Use the Parameter arrow-buttons from the GUI of VirtualDJ (Pads section) to select the
Sampler Bank (previous/next).
SLICER
Hold SHIFT down and then press the SLIP LOOP mode button to set the PADs to Slicer mode (button will be lit blue) and automatically load the Slicer Pads page in VirtualDJ GUI
The 8 pads represent eight sequential beats—"Slices"—in the Beat Grid. The currently playing Slice is represented by the currently green lit pad. The light will move through the pads as it progresses through each eight-Slice phrase. Press a pad to repeat that Slice (hold it down if you want to keep looping it).
Once the Pad is released the track will continue to play from the position it would have been if the pad was never pressed.
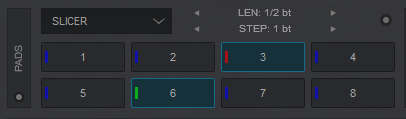
Slicer Pads Page – VirtualDJ GUI
Hold
SHIFT and then use the Pads to repeat the
memorized Slices (the Slices played/repeated last time)
Use the Parameter arrow-buttons from the GUI of VirtualDJ (Pads section) to adjust the
length of the Loop applied to the slice. or
adjust the step of the Slices
Key-Cue mode
Hold SHIFT down and then press the
BEAT JUMP mode button to set the PADs to KeyCue mode (button will be lit violet) and automatically load the KeyCue Pads page in VirtualDJ GUI
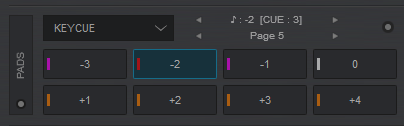
Keycue Page - VirtualDJ default skin
[IMAGE10]
Keycue Page when SHIFT is pressed - VirtualDJ default skin In this mode, the Pads trigger a selected Hotcue point (or the Temporary Cue if none selected or not available) at a selected Key semitone (from -7 to +7).
8 different pages/banks are offered with various semitone values to use and a 0 value (reset key to tis original value) is always offered in all pages.
Hold
SHIFT and then
select a Hotcue for the Key pads to trigger. Each time a Pad is pressed, the track will jump to that Hotcue point and will also alter the Key of the track to the value designated by it assigned value.
Use the Parameter arrow-buttons on the GUI of VirtualDJ (Pads section) to
adjust the Key of the track without trigger a Hotcue.
or select a different
page/bank with different key semitone values.
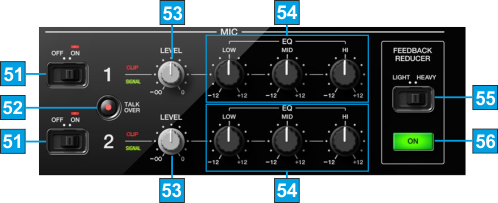
Microphone Inputs
The Pioneer XDJ-XZ offers 2 Microphone Inputs (connections at the rear panel) and separate controls at the top panel
KEY
ACTION
51 MIC 1/2 ON-OFFSet this switcher to OFF position to prevent audio signal from the Microphone Inputs (connections at the rear panel) from output. Set the switcher to ON position to allow audio signal from the Microphone Inputs and route to the Master Output52 MIC 1/2 TALKOVERWhen enabled (led lit) the Output of all Mixer Channels will be automatically reduced when signal is detected from any of the Microphone Inputs.53 MIC 1/2 LEVELUse the top/bottom knob to adjust the level of the Microphone Inputs 1/2 respectively54 MIC 1/2 EQUse the top/bottom HI, MID, LOW knobs to adjust the frequencies of the Microphone Inputs signals 1/2 respectively55 FEEDBACK REDUCER MODESelect the Microphone Feedback Reducer mode for both the Microphone Inputs56 FEEDBACK REDUCER ONEnable/disable the Microphone Feedback Reducer for both the Microphone InputsNote that the Microphone Inputs are not part of the USB Audio Interface, thus they cant be included to the Audio Setup of VirtualDJ, and the MIC Controls of the VirtualDJ GUI will not control these inputs (or vice versa), however both audio signals will be recorded along with your mix.
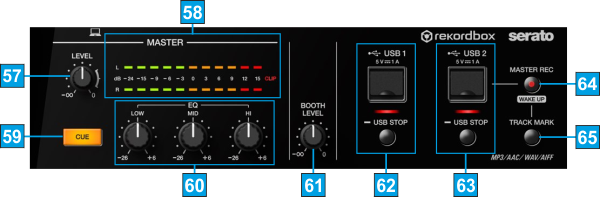
MASTER & USB SOURCES
KEY
ACTION
57 MASTER LEVELUse this knob to adjust the level of the Master Output (connection at the rear panel)58 MASTER VU METERThis series of leds indicate the level of the Master Output59 MASTER CUEUSe this button to send the signal of the Master Output to the Headphones channel. Use the Headphones Cue/Master mix knob to blend this signal with the signals of the Mixer Channels that have their CUE buttons enabled60 MASTER EQUse these knobs to adjust the High, Mid and Low frequencies of the Master Output signal61 BOOTH LEVELUse this knob to adjust the level of the Booth Output (connection at the rear panel)62 USB 1Use this socket to connect a USB Flash Drive. When connected, use the USB 1 button at the left side of the Display to Browse through its content. This source is not used within VirtualDJ.
Hold down the STOP button below this socket, until the led turns off, to stop reading its content and eject the Media. Do not disconnect the USB drive while its led is on63 USB 2Use this socket to connect a USB Flash Drive. When connected, use the USB 2 button at the left side of the Display to Browse through its content. This source is not used within VirtualDJ.
Hold down the STOP button below this socket, until the led turns off, to stop reading its content and eject the Media. Do not disconnect the USB drive while its led is on.
This USB connection can be used to record your mix, including any External Source and Microphones64 MASTER RECPress this button to start/stop recording your mix in the USB 2 Drive. The recorded tracks are stored in a PIONEER DJ REC folder in WAV format65 TRACK MARKUse this button to split the recording and continue as additional track.
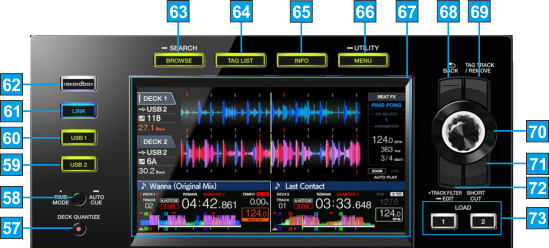
BROWSER & DISPLAY
KEY
ACTION
57 QUANTIZEUse this button to enable/disable Quantize mode. When enabled, Hotcues and Loops will snap to the nearest beat (or other value, depending on the Quantize step value)58 TIME MODEUse this button to toggle between the Remain and Elapsed Time view on the Display for the Decks.
Hold the same button down for more than 1 second to enable/disable Auto-Cue. When enabled (A.CUE indication on the Display), tracks will load on the 1st available Hot Cue or (First beat if not available)59 USB 1Press this button to read and browse the content of the USB Flash Drive connected to the USB Source 1 socket.60 USB 2Press this button to read and browse the content of the USB Flash Drive connected to the USB Source 2 socket.61 LINKPress this button to read and browse tracks and folders from VirtualDJ.62 REKORDBOXPress this button to read and browse tracks from Rekordbox when connected via Ethernet (connection at the rear panel). This mode is not used from VirtualDJ63 BROWSEPress this button to display the Browser view on the Display. Press again to return to the Waves/Decks view64 TAG LISTPress this button to display the Tag List of a USB Source. Not available with LINK (VirtualDJ) mode.65 INFOPress this button to display a view on the Display with Information for the loaded Tracks (such as Title, Artist, Album, BPM, Genre, Key etc). Press again to return to the Waves/Decks view.66 MENUHold this button down for more than 2 seconds to access the Utilities menu of the unit and adjust several settings.
While the BROWSE view is enabled, press this button to get the Video mode view and select a Video Transition, enable Title, Slideshow and Camera plugins and other Video functions.67 DISPLAYDisplay with various views and information.68 BACKPress this button to set focus to the Folders list of VirtualDJ Browser and get the Folders view on the Display. If focus is on Folders, use this button to expand/collapse sub-folders.69 TAG TRACKPress this button to open the File Info window on the Browser of the VirtualDJ GUI and view additional track information.70 BROWSE/ZOOMWhen in Waves/Decks view, use this rotary to zoom waves in/out. When in Browser view, use this rotary to scroll through folders and tracks. Push the rotary to set focus to the Songs list (if not already) and view the content of the folder on the Display
Hold SHIFT down and then push the rotary to select the Sideview and view its content on the Display. Hold SHIFT down and then use the rotary to cycle through the available lists of Sideview (Automix, Sidelist, Sampler, Karaoke and Shortcuts).71 SHORTCUTUse this button to show some additional settings Display view to adjust the Quantize step value, Lock/Unlock the Needle on the Decks/Wave view, assign unit to Decks 3,4 etc.72 TRACK FILTERThis button is not used in LINK (VirtualDJ) mode.73 LOADUse these buttons to load the selected track to either left or right deck.
FRONT & REAR PANELS
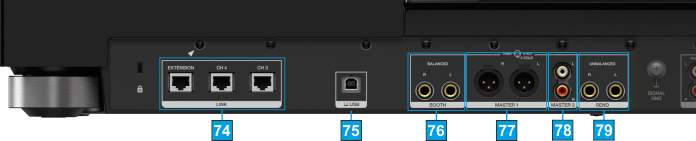 Pioneer XDJ-XZ - Rear panel 74 LINKPRO DJ Link (Ethernet) connections for Rekordbox mode. These connections are not used from VirtualDJ75 USBThis USB connection sends and receives audio and control information from a connected computer.76 BOOTH OUTBalanced Booth Output. Connect your Booth monitor speaker to this socket, using 1/4" TRS cables. The level of this output is controlled by the BOOTH LEVEL knob at the top panel77 MASTER 1 OUTBalanced Master Output. Connect your powered speakers or power amp here using XLR type cables. The level of this output is controlled by the MASTER LEVEL knob at the top panel78 MASTER 2 OUTAlternative Un-Balanced Master Output. Connect your powered speakers or power amp here using RCA type cables. The level of this output is controlled by the MASTER LEVEL knob at the top panel79 SENDOutputs the sound from the channel specified with the BEAT FX channel selector switch to the external device such as a DJ Sampler.
 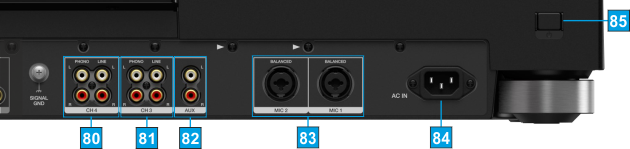 Pioneer XDJ-XZ - Rear panel 80 CH4 INPUTThese sockets input sound to mixer channel 4 and supports both LINE and PHONO type devices. The signal of this input will go through the CH4 of the XDJ-XZ if the CH4 INPUT source selector (top panel) is set to either LINE or PHONO. This input is also part of the USB Audio Interface, and can be used for Timecode-DVS control. See Advanced Setup.81 CH3 INPUTThese sockets input sound to mixer channel 3 and supports both LINE and PHONO type devices. The signal of this input will go through the CH3 of the XDJ-XZ if the CH3 INPUT source selector (top panel) is set to either LINE or PHONO. This input is also part of the USB Audio Interface, and can be used for Timecode-DVS control. See Advanced Setup.82 AUX INPUTUse this socket to connect an external media source, such as Media player, CD Player, i-Pod, Smart-Phone etc The signal of this input is routed to the Master Output if the AUX source selector at the top panel is set to LINE/PORTABLE and can be turn on/off and adjust its Volume from the top panel (AUX and AUX TRIM)83 MIC 1 / MIC 2 INPUTConnect up to 2 microphones to these sockets using XLR or TRS plugs. The output levels of these Inputs are controlled from the top panel84 AC INUse the provided AC cable to connect XDJ-XZ to a power outlet. 85 POWERUse this Switch to power the unit on and off. Turn on XDJ-XZ after all input devices have been connected and before you turn on amplifiers. Turn off amplifiers before you turn off the XDJ-XZ
 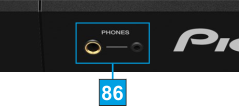 Pioneer XDJ-XZ - Front panel 86 PHONES SOCKETConnect your 1/4" or 1/8" headphones to this output for cueing and mix monitoring. The level of this output is controlled from the top panel
ADVANCED SETUP
The Pioneer XDJ-XZ is capable of controlling up to 4 Decks, combined from the 2 USB sources and VirtualDJ Decks.
Available combinations
- Both sides set to standalone (USB). When both left and right sides have tracks loaded from the USB sources, the unit offers:
[list] - Mixer Channel 3 : Audio from VirtualDJ Deck 3 when CH3 INPUT switch is set to computer position, or from external audio source connected to CH3 Inputs at the rear panel when set to LINE or PHONO.
- Mixer Channel 1 and 2 : Audio from the USB sources.
- Mixer Channel 4 : Audio from VirtualDJ Deck 3 when CH4 INPUT switch is set to computer position, or from external audio source connected to CH4 Inputs at the rear panel when set to LINE or PHONO.
The left and right Deck panels of the XDJ-XZ will control the tracks loaded from USB sources and there is no deck switch available from the SHORTCUT view. The Displays will offer waves and information only from the USB tracks[/list]
- Both sides set to LINK (VirtualDJ). When both left and right sides have tracks loaded from the LINK source (VirtualDJ), the unit offers:
[list] - Mixer Channel 3 : Audio from VirtualDJ Deck 3 when CH3 INPUT switch is set to computer position, or from external audio source connected to CH3 Inputs at the rear panel when set to LINE or PHONO.
- Mixer Channels 2 and 3 : Audio from VirtualDJ Decks 2 and 3
- Mixer Channel 4 : Audio from VirtualDJ Deck 3 when CH4 INPUT switch is set to computer position, or from external audio source connected to CH4 Inputs at the rear panel when set to LINE or PHONO.
The Deck panels of the XDJ-XZ will control the tracks loaded to Decks 1 to 4 of VirtualDJ. The deck switch is available from the SHORTCUT view. The Displays will offer waves and information from the Deck that is selected from the SHORTCUT view (left and right).[/list]
- One side set to LINK (VirtualDJ) and the other set to USB. In this case the unit offers:
[list] - Mixer Channel 3 : Audio from VirtualDJ Deck 3 when CH3 INPUT switch is set to computer position, or from external audio source connected to CH3 Inputs at the rear panel when set to LINE or PHONO.
- Mixer Channels 2 : Audio from VirtualDJ Deck 2 or USB source depending on the mode the side is set to.
- Mixer Channels 3 : Audio from VirtualDJ Deck 3 or USB source depending on the mode the side is set to.
- Mixer Channel 4 : Audio from VirtualDJ Deck 3 when CH4 INPUT switch is set to computer position, or from external audio source connected to CH4 Inputs at the rear panel when set to LINE or PHONO.
For the side set to USB 1/2, the Deck panel of the XDJ-XZ will control the track loaded from the USB 1/2 source.
For the side set to LINK (VirtualDJ), the Deck panel of the XDJ-XZ will control the track loaded to VirtualDJ Deck 1 or 2 (depending on the side).
The decks swap will not be available from the SHORTCUT view.[/list]
The Pioneer XDJ-XZ offers a list of settings with most of them applying when using one of the USB1/USB2 modes (playing tracks in stand-alone mode from the USB drives.)
To access the UTILITIES view...
- Hold down the MENU button for 2 seconds.
- Turn the BROWSE/ZOOM encoder at the right side of the main Display to browse through the available settings.
- Push the BROWSE/ZOOM encoder to select a setting.
- Turn the BROWSE/ZOOM encoder to adjust the value of the selected setting
- Push the BROWSE/ZOOM encoder to save the new value of the selected setting
- When done with changing the settings, press the MENU button to exit the UTILITIES view
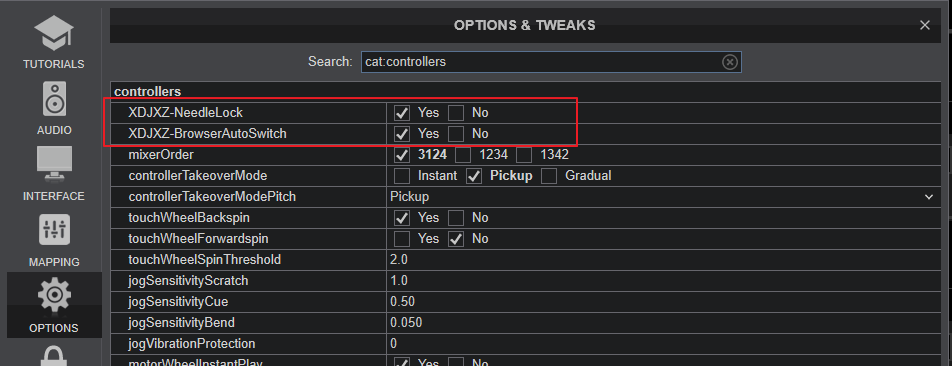
Open VirtualDJ Settings ->OPTIONS tab and select the CONTROLLER sub-category from the right side.
 XDJ-XZ Settings
 NEEDLE LOCK
When
XDJXZ-NeedleLock setting is set to
Yes (default selection), the Needle is
unlocked and you can touch the Song Progress wave on the main LCD and jump to a position on the loaded track.
When
XDJXZ-NeedleLock setting is set to
No the Needle is
locked and touching the Song Progress wave on the main LCD will have no effect.
This option is useful to prevent accidental track jumps when the Needle (Song Progress Wave on Display) is accidentally touched
BROWSER VIEW SWITCH
When setting
BrowserAutoSwitch is set to
Yes (default selection), the Browser view Switch is set to
Automatic. In this mode, when a Track is selected and loaded to a Deck, the Decks/Waves view will automatically offered without pressing any other buttons.
When setting
BrowserAutoSwitch is set to
No, the Browser view Switch is set to
Manual.and the Browser View will remain active after loading a track and the BROWSER button above the Display needs to be manually pressed to return to the Decks/Waves view.
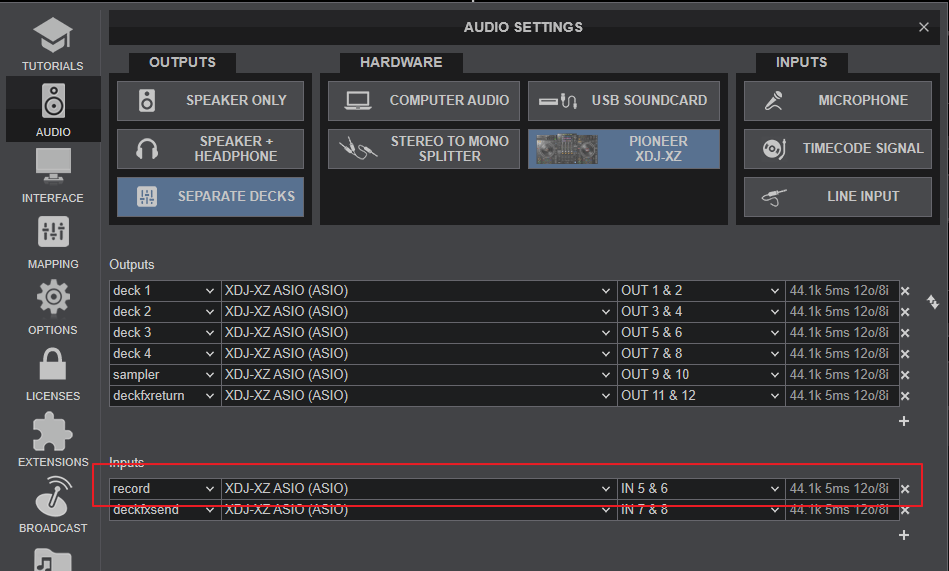
The USB Audio Interface of the Pioneer XDJ-XZ offers a dedicated Input for recording the Master Output (your mix) along with the Microphone, LINE/PHONO, and AUX Inputs directly from VirtualDJ record button (in the MASTER center panel), and is already pre-configured, so no further adjustments need to be done.
The Pioneer XDJ-XZ offers 2 stereo inputs for DVS (Timecoded CDs and Vinyls) Support.
Depending on whether you use Timecode Vinyl (Turntables) or Timecode CDs (CD Players) please perform the following steps:
- Connect your Turntables to CH 3 and/or CH 4 Inputs at the rear panel of the XDJ-XZ.
- From the UTILITIES menu (see above), set the CH3/ CH4 CONTROL TONE to either PHONO or LINE, depending on the used connections and devices type.
- Open VirtualDJ Settings ->AUDIO tab ans press the TIMECODE SIGNAL button from the INPUT tab, for the following Audio setup to be configured
- Click to APPLY
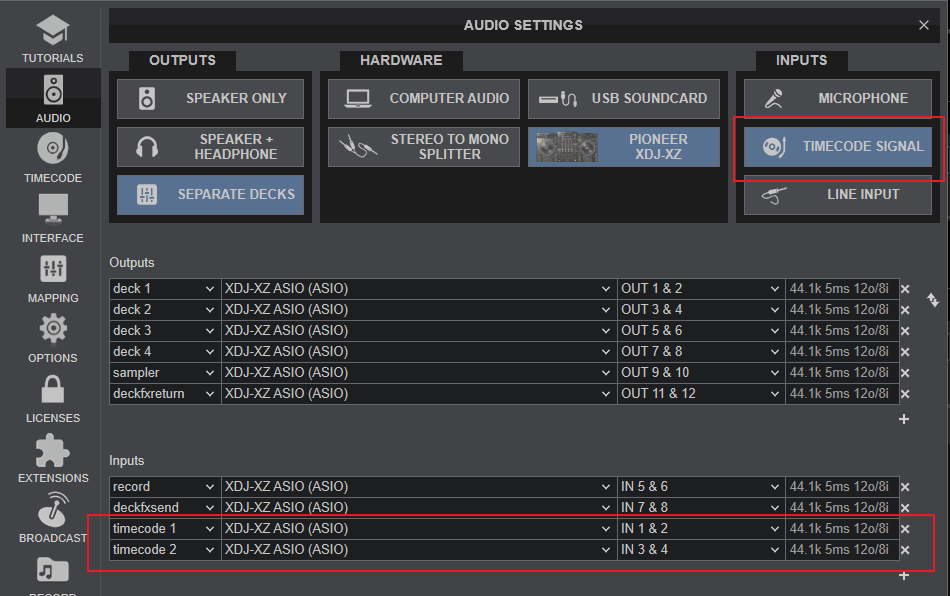 Audio configurations with Timecode Inputs Use the TIMECODE ON buttons that will be offered on the Decks panel of the default VirtualDJ GUI, to enable/disable Timecode control on a Deck
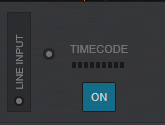
For further Technical features and specifications, visit Pioneer XDJ-XZ
Product's Page
 Hardware Integration Department 2020 - ATOMIX PRODUCTIONS Reproduction of this manual in full or in part without written permission from Atomix Productions is prohibited.